Grob 120 Snonit - 1/72 FSC Dujin by Dan Yeoman
- Yoav Efrati
- Sep 18, 2025
- 4 min read

In 2002 the IAF selected a new primary trainer to replace the ageing Piper Super Cubs.

Operated by Elbit Systems under a Private Finance Initiative, 17 Grob 120-AI aircraft were selected and given the name Snonit (Swallow).

As the aircraft are owned by Elbit they retain a civil registration. The aircraft are flown by the IAF Flight Academy at Hatzerim.

Kit Options:
For the modeler, there is not much choice if you want to make this aircraft as a model in 1/72 scale.

FSC Dujin make a Grob120, unfortunately this is very difficult to get hold of, out of stock in most places. Air-Master make a Grob Tutor (a Grob115E) which would require more modification and again is out of stock everywhere. I contacted FSC Dujin by email via their website https://www.jfrteam-neufgrange.fr and managed to secure an example (along with a couple of other rare IAF related aircraft).
Construction
On opening the box, it looks a daunting task and I was not wrong. Significant flash from the resin moldings, which are a little dated, some warping of the resin. Some PE to “enhance”the rather basic kit is included, as are decals for non-relevantmarkings and instructions are in French.

There are no markings of any relevance that you can get after-market, so that was going to be an additional challenge. I cleaned up all the flash and dry fitted everything to see where the problems would occur and straightened the warped resin by a quick immersion in boiling water. Then I formulated a plan.
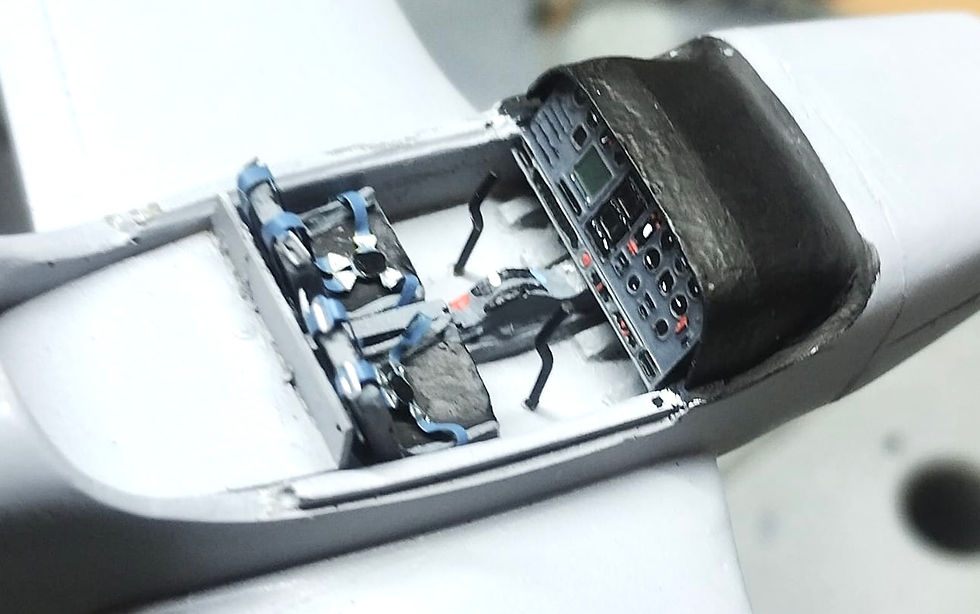
Starting with the cockpit, I used reference photos I found online to detail the cockpit which appeared light grey, so I used Vallejo Primer 70.615 Light Ghost Grey. The seat covers I painted Vallejo Color black and painted the PE Instrument panel as best I could in this scale. PE seat belts were a little oversized, but look OK.
I used a Dremmel multi tool to hollow out the nose further to add weight, for which I use “Liquid Gravity” sealed with cyanoacrylate glue.

Once the fuselage was together and wings on, again using cyanoacrylate glue, time to trim the vacform canopy. A new blade on the scalpel is required, with lots of small cuts and lots of test fitting. It was not a perfect fit, but pretty good.
The canopy was then dipped in Johnson’s “Klear” and then tinted by airbrushing Tamiya X-19 Smoke and attached using Mig Ammo Ultra Glue.
Filling with Deluxe Perfect Putty and sanding, especially at the wing roots and canopy join, followed by a coat of MrSurfacer Grey 1000. After more sanding, Mr Surfacer White 1500 was applied before several coats of Vallejo Model Air “” 71.001.

This is where you need talented friends. I asked Naor Aviv(IPMS Israel) to help create custom masks that would be used to paint the red markings. I provided Naor with scale drawings and the best photos I could find in plan forms, in return he provided me with several drawings to create masks with a vinyl cutter. Another friend in the UK cut the masks from the drawings I provided from Naor.

With a bit of work and some extra tape, the red was airbrushed, I used Vallejo Model Air 71.085 “Ferrari Red” which was the best match I had for the red FS11310 used according to the app “Hobby Color Converter”. The model was then varnished with several coats of Vallejo Polyurethane Gloss varnish.


The propeller is painted Matt Black on the reverse, and Light grey (anodized aluminum is the proper colour) with white tips.
Pitot tube was made from Albion Alloys tubing.
Decals
For the markings, I found the best match for the style and size of registration on the Xtradecal sheet X48044 “RAF 4”, 8” & 12” Black Letters Numbers and Command Titles”. Whilst not perfect, if you choose your specific aircraft carefully, the match is good enough for the letter style although they should be slightly thicker.

Flight School badges where taken from the Almark set of IAF Unit badges rather than Isradecals as I found them to be a better size match.

Drawings for the other markings where found in “Camouflage & Markings The IAFPart 3: 2002 to 2012” by Ofer Zidon and printed on Inkjet decal paper, sealed with Microscale Liquid Decal Film, certainly not Cartograph quality, but the best I could achieve. Final assembly of the fragile parts, aerials etc followed by more gloss varnish to seal the decals. Weathering was achieved with Mig Ammo Panel line wash A.MIG-1601“Medium Grey” and MiG Ammo A.MIG-1203 “Streaking Grime” applied. It is at this point I noticed that some aircraft have black areas painted behind the exhausts. On further investigation, the black areas appear to have been painted later in the service life, so these could be left off.

In my quest to build every IAF operated aircraft, you have to build some poor, limited run kits. This model was a challenge at every step, it was never going to be the perfect model, however, be inventive, ask friends and you can achieve a reasonable result. Happy modelling!!


Thank you Dan Yoeman for contributing this article to the YOAVIATION web site.🙏


Comments