
Eduard 1/48 scale Avia S-199
Updated: Jul 7

The Eduard 1/48 scale Avia S-199 is a long-awaited version of Willy Messershmitt's Bf-109 fighter manufactured in Czechoslovakia immediately after World War II using left over BF-109G fuselage, wings, Jumo 211 engines (mounted upside down) and wide chord prop blades. The airplane's large propeller gave this aircraft high torque and handling qualities barely sufficient for its pilots to counter, due to the use of the Bf-109G's unmodified rudder and standard (insufficient) width main landing gear spread.

“Operation Balak” saw the air fraight delivery of 24 Avia S-199 “Messers” from Czechoslovakia to Israel, via Yugoslavia air base named Etzion on board C-46 Curtiss Commando transport planes.
Although an inferior aircraft by post WWII standards, it was the only fighter plane available to the newly declared state of Israel in the spring of 1948. Flown by former RAF and USAAF pilots, the "Messer" proved capable of stopping the Egyptian Army's advance from the Sinai at the outskirts of Ashdot (30 minutes' drive from Tel Aviv) and downing Royal Egyptian and Syrian Fighter planes attacking Jewish population centers in Israel.

Eduard – Hybrid kit # 948011 offers three Israeli Air Force and three Czechoslovakian Erla canopy versions of the S-199, of which I can comment only on the Israeli Air Force (IAF) versions. IAF 101 squadron pilots flying the Avia S-199 referred to them as The Messerschmitt and in short "Messer" that also means Knife in Yiddish. Messer number Daled-123 is illustrated on the kit's box art, as it appeared in a post War of Independence 14 March 1949 photograph, downing a Royal Egyptian Air Force Spitfire, an event which did not happen with this airplane.

Full color red and white spinner and rudder stripe markings first appeared on 101 squadron fighters on the eve of "Operation Ten Commandments" which was later renamed "Operation Yoav" that began on the night of 15-16 October 1948.

Official 101squadron records state that on the 16 October 1948, Rudi Augarten attained an unconfirmed REAF Spitfire kill while flying Messer number Daled-121 (kill unconfirmed due to the wreckage felling behind enemy lines).
Messer number Daled-121 was retained as a gate guard by the 101 squadron (wearing a large white number 4) and was transferred to the Israel Air Force Museum serving as the only surviving S-199 airframe in Israel.

While building this new kit, I visited Daled-121 at the IAF museum although is in incorrectly identified with the tail number Daled-120 to confirm wheel well and fuselage details that differed from this kit.

Along with the markings provided for Daled-123, the Eduards kit provides markings for Messer number Daled-108 that features a chin intake and long tail wheel. Daled-108 was the longest serving Messer in IAF service and can also be painted up with the colorful 101sq markings as seen worn by Daled-123 on the box art.

The third Israeli Air Force Messer markings offered is Daled-117 nicknamed "Nechama" by the squadron's lead mechanic "Eli Reuvenie" who chalked his sweetheart's name on the Star of David. When working at Israel Aircraft Industries over a quarter of century ago, I had the honor of meeting Eli who provided me with photos that made this "Nechama" and Messer number Daled-117 famous.

Kit Contents:

Kit’s box art altered to correct the Messer’s tail number to ד-121.
The kit is their first kit that replaces injection molded interior components with resin printed parts and provides "Brassin Resin" parts that are usually purchased as after market items by advanced modelers.
Three grey plastic parts trees comprise the main components of the airframe, including fuselage, wings, control surfaces, spinner and propeller.
A clear parts tree if provided with optional Erla and blown clear canopies and two windshield options. A pre-cut clear parts mask makes this task quick and easy.

Kit option parts enable the modeler to build any version of the S-199 but the five markings options in the Eduard printed decal sheet are only for the Erla canopy airframes.


A gloss printed A4 sized booklet provides clear assembly, decal application instructions as well as a brief history of each airplane provided in the kit's decal sheet. To aid the modeler's painting, a pre-cut mask is provided for the canopies and wheels.
IAF Messers routinely flew with 4 X ETC50 conformal bomb racks which are not included in the kit and need to be obtained separately from Eduard Brassin set 6481152.
For my double build, I chose a pair of Messers that were not offered in the kit; the first early nose intake fitted tail number Daled-106 flown by squadron commander Modi Alon who attained a double REAF C-47 Dakota bomber kills on June 3rd, 1948.

For my second build I chose the late model Daled-121 flown by Rudi Augarten and credited with a REAF Spitfire kill, wearing the complete colorful markings of the 101squadron as it appeared with white numbers in a 14 March 1949 photograph.

Kit Assembly:
The first step in the assembly process is removing the resin parts from their 3D print supports. The kit’s resin items are fragile and require careful removal from their printed supports. Unfortunately, in one of my kits I found a crushed left rudder pedal which could not be repaired, on the second I was lucky and although it detached it remained complete allowing me to cement it back in place using cyanoacrylate cement.

Resin Printed Parts Removal – Dry Method
On my first kit I removed the resin printed parts from their supports using nippers, a course sanding stick, a razor saw and a brand new #11 blade. Although exercising care in careful removal of the parts, I still manage to brake several, including a rudder trim wheel, left lower wing tip probe, and long braded hose. Using this "dry method" it's best to remove small delicate parts by nipping them off as far as possible from the part, after which additional trimming is done with a sharp #11 blade. I recommend that the resin parts cutting and sanding be done over a damp cotton cloth to minimize resin dust and residue from spreading with an additional benefit of the dap cloth's ability to catch parts that inadvertently break away. Attachment of the resin parts to each other was done using cyanoacrylate cement.

Resin Printed Parts Removal – Hot Water Method
A better method of removing resin printed parts from their supports was passed on to me by fellow model builder, Mr. Marcin Czarnowicz. Marcin recommended that I heat up the resin parts before removing them from their supports. On my second resin set I placed all the resin printed parts in a cup of hot water. The parts absorbed the heat which softened them to the hardness likened to rubber without deforming their fine detail. Removal of the parts from their supports was done using a sharp curved blade nail cutting scissors that could get in between the tightly spaced supports. Additional cleanup of the remaining stub risers from the parts was easily done using a sharp #11 blade X-Acto knife. An added advantage of this hot water resin parts softening method is the elimination of most of the sanding residue.

Fuselage Assembly:

The first items to be painted are the cockpit interior resin parts. Late war Messerschmitt Bf-109's cockpit was painted RLM66 Black-Grey; the closest match I found in the ATOM range is ATOM-20160. The kit’s resin cockpit was brush painted ATOM-20160 diluted with window cleaner with no primer needed. After a day’s drying time it was given a wash of A.MIG-1617 blue-grey, to enhance the recessed detail. The following morning's half-hour session consisted of highlighting the RLM66 cockpit interior detail with a dry brush of ATOM-20000 Matt White. Excessive white was removed with a cotton swab moistened with water. Additional ATOM colors used in the cockpit include: Seat straps A20009, Yellow pipes A20019, Red cockpit knobs A20029, Red cockpit trim wheels & dial rims A20031, Joy Stick Base Leather A20050, Blue oxygen regulator RHS cockpit sidewall mix A20102 + A20108.
Once the cockpit parts were painted, in opted to install the instrument panel and cockpit tub to the left side of the fuselage, instead of inserting the tub onto preassembled fuselage halves, as shown in the instructions. The instrument panel is attached to the left side of the fuselage using two thin brittle resin pins; I reinforced this joint by cementing a piece of the kit's plastic parts tree between the forward (flat) face of the instrument panel and the left side of the fuselage, using cyanoacrylate cement.

The instrument panel is attached to the left side of the fuselage using two thin brittle resin pins; I reinforced this joint by cementing a piece of the kit's plastic parts tree between the forward (flat) face of the instrument panel and the left side of the fuselage, using cyanoacrylate cement.
With the cockpit painted, the cockpit tub was attached to the left fuselage half instead of inserting the tub into a joined fuselage as shown in the instructions. Dry fitting the tub with the two fuselage halves together is not possible without force fitting and possibly causing damage to the delicate interior detail.
Fuselage Panel Lines & Rivets?
External surface detail of the model provides rivet detail along the upper and lower aft fuselage joint line. The S-199 is constructed in left and right halves so there is a joint line along the aft fuselage centre line, but in all photographs of the S-199 and in the airframes restored in Prague Aviation Museum and in the Israel Air Force Museum, these centrelines do not appear, furthermore, the vertical joint lines along the aft fuselage are also not visible.


Fellow Israeli aviation historian, Avinoam Misnikov, who worked at Cyclone Aviation at the time that the S-199 was restored stated that airframe was covered with fiberglass. In addition, fellow modeler and aviation historian Martin Cerny from the Czech Republic also confirmed that panel lines on the S-199 were filled, most likely done to improve the S-199 aerodynamic smoothness due to the underpowered engine fitted to the airframe.
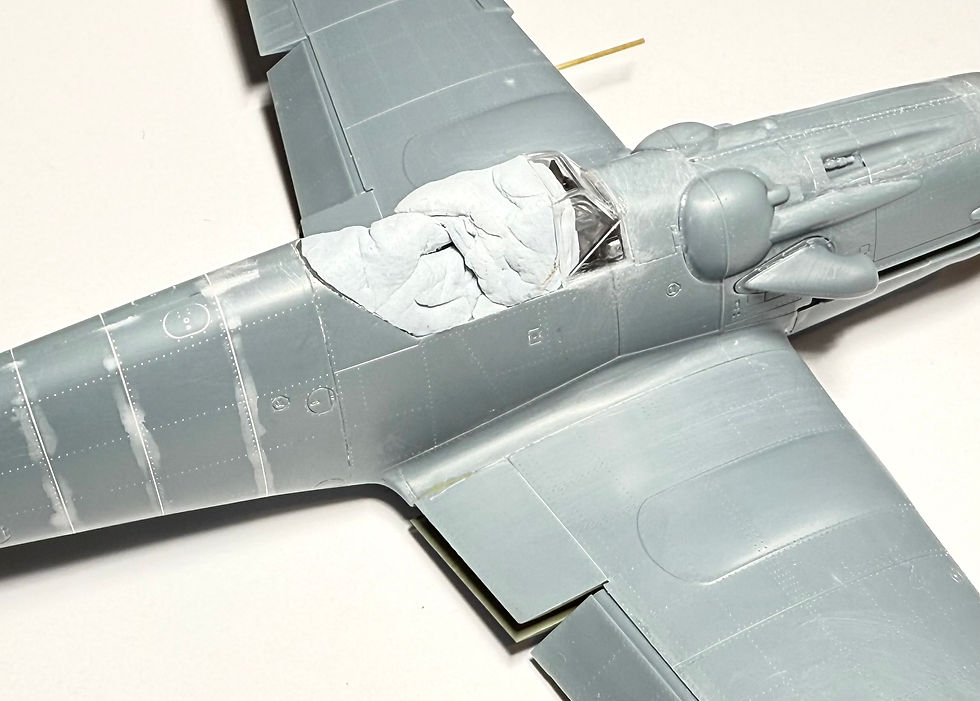
Photos of the S-199 show no visible panel lines along the aft fuselage, while some rivet heads do appear. I found Deluxe Plastic Perfect Putty to be ideal for filling the aft fuselage panels joint lines while keeping the rivets visible.

The putty is water soluble which enables removal of excess with a cotton swab moistened with water. Using the moistened cotton swab, I left the putty inside the panel lines, while wiping off unwanted putty from the rivet recesses. Further filling of the panel lines was required using Mr. Primer Surfacer 1000 applied over the panel lines with a brush. Once dry, the surfacer was sanded smooth using wet 2000 grit sandpaper. This two-step method enabled filling of the panel lines yet preserved the stepped fuselage contours and the fine recessed rivet detail.
The left wingtip pitot tube is molded onto the upper wing half D8 and is prone to breakage. I bored a channel into the lower surface of the wing using a razor saw and used the kit's pitot as a dimensional reference for making a metal replacement. The metal pitot was made from K&S Precision Metals steel rod stock #498 .015" (.38mm) Music Wire and Albion Alloys Ltd Aluminum Tube 0.7 mm diameter found in a four rod set SFT4 which was cemented to the lower wing channel with cyanoacrylate cement.

Eduard’s S-199 kit is based on the airframe preserved at the Prague Aviation Museum, which has a blown canopy and rounded wheel well openings. A walk around I made of the S-199 airframe that is on display at the Israel Air Force Museum is fitted with an early ERLA canopy and has wheel wells with straight outboard edges.

Using the photos I took of the Messer airframe on display at the Israel Air Force Museum for this build I proceeded to revise the kit parts to represent the shape found on the aircraft. A straight line was scribed into the plastic, 1mm inboard of the panel line adjacent to the wheel wells. Existing diagonal panel lines already exist in the plastic where the diagonal cuts need to be made. Curved resin wheel walls were trimmed at location of the straight cut line and replaced with strips of sheet plastic.
Wing and fuselage, less the control surfaces were joined together, using cyanoacrylate cement at lower forward cockpit – wing joint line and liquid cement along the fuselage – wing root joint lines; fit was excellent with no filler being needed. Please note, do not apply cement to the aft end of the upper wing, this section is a flap for the wing radiators and should be slightly above the remaining wing surface. Moving on to step 5 of the instructions I attached the horizontal stabilizers to the empennage using cyanoacrylate cement and metal rods inserted into holds drilled through the stabiliser's' locating pins.
At this stage kit assembly diverged into the early Daled-106 airframe and Daled-121 airframe. The early lower nose intake Daled-106 optional parts E13+E32, E22 and E24 were used and the late Daled-121 optional parts E20, E25 and E27 were used. At this stage the nose machine gun fairing (unnumbered part) was cemented in place with resin machine guns RP17 and RP18 already attached. The centerline engine covers hinge is provided as a separate part, either resin RP38 or plastic E34 are provided. Unfortunately RP38 proved too fragile and I resorted to using the plastic alternative, set into place using liquid cement.

The S-199's large distinctive carburetor intake is provided as a resin part RP16, do not sand off the external mold line found on the intake, it should be there! The lower nose section parts E20 and E32 have a tight fit but no positive locating support to insure that they are flush with the outer contour of the nose. These parts need to be dry fitted to the required location and once in place cemented externally using liquid cement applied to the joint line.


Next to be added were the Brassin resin printed conformal bomb racks. Their attachment location is a bit ambiguous and should be noted in the photos shown in this article. On Daled-121 the lower nose part E20 external oil sump, the pile is inserted into the forward hole provided in the conformal bomb rack. On Daled-106 there is no oil line so position the rack sufficiently aft as not to block the lower fuselage access panel adjacent to it.
The lower wing radiator grill parts E1, E2, E3 and E4 were brush painted ATOM-20165 Aluminium instead of silver noted in the instruction. The inner surface of the radiator flaps and intake E16 and E19 was painted ATOM-20078 (RLM02) which is actually more of a grey-green colour then a grey and their aft flap was bent downward to provide an open gap as seen in photos of the S-199 on the ground. Daled-106 flaps were placed in a down position and the ailerons were set to neutral, while the horizontal stabilizer trailing edges were dropped and the rudder positioned slightly to the left. Daled-121 flaps were positioned fully up and the ailerons set to neutral, while the horizontal stabilizer trailing edges were dropped and the rudder positioned straight.

The kit provides resin barrels for the underwing cannon pods. I avoid possible breakage later I replaced them with Albion Alloys 0.9mm brass barrels. I cemented a predrilled plastic block to the base of the pod. Through the plastic block, plastic barrel transition cover and the brass barrels, I inserted a .015" K&S #5498 steel music wire.

Steel music wire was also cemented to channels made in the main and tail gear using a razor saw and the back end of an X-Acto #10 blade. The gun sight and windshield were cemented in place, with gentle sanding required around the edge of the windshield mating surfaces. Wing tip clear lenses were also added at this time, cemented in place with liquid cement.

For a durable joint, I inserted fine metal rod along a channel I sawed along the length of the antenna mast, bonded in place with cyanoacrylate cement. To the clear canopy frame where the antenna is joined, I drilled a hole to accept the metal rod stem. The antenna mast was attached to the canopy frame using cyanoacrylate cement. The clear armor guard was attached to the base of the canopy frame using Revell viscus plastic melting cement and the top of the guard was cemented to the clear canopy above it using plastic "wood" glue, thinned with water so it will seep into the cavity between the two parts.

In preparation for painting, the final step prior to masking and painting is cleaning. Warm running water, liquid soap and a toothbrush are used to dislodge sanding dust residue from inside the recessed panel detail. The cockpit opening was masked using Blue Tack but to avoid it sticking in the interior detail, strips of rubber glove were first inserted into the cavity. The kit's pre-cut Kabuki makes were applied to the external surface of the windshield using a fine tipped ANYZ tweezers that enable precise alignment of the masks with the frame lines on the clear part.
Due to the filling of the empennage vertical panel lines, they could not be used as guides for applying the white-blue-white identification stripe. Measuring the blue stripe provided in the decal sheet, it measured 2mm in with which means that the three stripes combined are 6mm wide. Tamiya makes 6mm wide stripe tape which was applied at the location of the fuselage stripe. Once the location of the stripe was set, Tamiya tape was applied forward and aft of the reference stripe. With the forward and aft masking tape stripes in place, the center stripe was removed to allow for painting of the white stripe.

The Messer’s color:

In a 1992 visit to the Israel Air Force Museum, the late president of Israel, and former “Messer” pilot, Ezer Weissman stated that the Messer in the Museum which was painted grey, “was painted in the wrong color “. I took the initiative and sent Ezer a letter with paint color chips that were believed to be the color of the Messer amongst the model building community. Two weeks later, I was invited to meet with the president, who confirmed that the Messer color was not RLM02, but a green color “similar to the Khaki Green color used by the IDF in its uniforms”. It took me several years to see the color for myself on a fuel filling cap kept locked up in a safe at the IAF museum. The color matches RAL6013 with has a direct Revell paint match - SM362. This color I mixed using Ammo-Mig Atom paint colors noted below.

Painting:
With the vertical empennage panel lines filled, I first painted the white stripe using the filled panel lines as parallel line guides. I first applied strips of 6mm wide Tamiya Tape at the empennage stripe location. Alongside this stripe, thinner additional stripes were applied around the fuselage, once in place, the center 6mm wide masking tape was removed. ATOM-20000 Flat white was sprayed directly onto the plastic until opacity was achieved. Once dry, this white stripe was masked over to protect it from overspray. White was also sprayed on the prop-hub of Daled-120, and its rudder. Over the white hub, ATOM-20029 red was applied with an air brush.
The RAL6013 fuselage color was mixed using equal parts of ATOM 20072 + 20079 and 20000 and this mix was diluted with window cleaner and Quick Shine floor finish (replaces Pledge Future Klear). This mix provided me a tough, self leveling semi-gloss finish over the entire model onto which I applied an additional layer of Quick Shine diluted with window cleaner to prepare the surface for enamel wash and decals.

The airframes depicted were in service for a short time, so I kept their weathering to a minimum and preferred to enhance the panel lines and dirty up the walkway and maintenance areas using AMMO-MIG enamel-based washes. A.MIG-1622 Ochre for Sand Camo was used to "muddy up" the undersides of Daled-106 that took off from Hertzelia improvised dirt strip. A.MIG-1602 Deep Grey for the engine and machine gun grime. A.MIG-1611 Black Night for the access panel lines and A.MIG-1621 Shadow for Desert Brown for upper wing root and side of fuselage walkway areas. Upper wing and horizontal stabilizer surfaces were highlighted by brush painting with the basic green color lightened with white and diluted with window cleaner. The weathered areas were protected with thin sprayed on layer Quick Shine.
Decal Application:
For both models I used a combination of the kit's decals and aftermarket decal sets. Stars of David and Daled-106 markings were taken from Sky's Decals sheet SD-21/22 (printed in 2006) and all stencils were sourced from the kit. Daled-121 identification number, stencils and upper wing roundels were sourced from the Eduard kit decals, the 101 squadron insignia from IsraDecal IAF markings sheet IAF-1 and the remaining roundels from Sky's Decal sheet SD-21/22. All decals were applied using Quick Shine as whetting agent.
After Decals Assembly:
ATOM-20029 red was brush painted over the kit decal's red rudder stripe decals after application and masking. ATOM-20108 Prussian Blue was used to touch up the blue segment of the empennage tail identification band.
Prior to attachment, the landing gear struts were painted with RLM02 using ATOM paint mix, wheel hubs satin black ATOM-20163 and tires rubber & tire black A.MIG-0033.


Eduard 1/48 S-199 “Messer” resin exhausts are beautifully detailed and need to be handled with care. To fit them in place, reduce the width of mounting base at the forward end and just a fraction at the aft end. The exhaust resin parts need to be slid into place at the forward end first and should fall into place at their aft end, without the need to exert pressure (which may brake them). Paintings the exhaust stacks is easy when brushing on a base coat of AMMO by Mig Jimenez ATOM: Matt Black ATOM-20163 followed with a dry brush layer of Burnt Iron ATOM-20169.
Eduard's aftermarket conformal bomb rack and bombs instruct painting the bombs Dark Green. German WWII dark green is RLM82 which I found ATOM-20067 as a suitable match. The bombs provided in the set have cylindrical risers (painted bright silver) molded adjacent to them, which I've never seen before and did not find photographic proof of their use on the Messer, but I did not remove them due to likelihood of braking off the adjacent fins. The prop and spinner were cemented together and attached to the forward end of the nose (without the ability to spin the prop). The next step was to spray the entire model with a semi-matt layer mix of Tamiya Flat Base X-21and Quick Shine diluted with window cleaner. I opted to display Daled-120 with the canopy in the open position. I removed paint from the surface of the right cockpit sill and the canopy's frame line and joined them together with a slight amount of cyanoacrylate cement to hold them together, followed with liquid cement along the edge of the joint line. Next Albion Alloys thin brass wire, 20mm long was attached from the cockpit aft sill provided hole to the canopy's frame aft edge. 0.9Kg Fishing line .006" (0.15mm) thick was extended from the tip of the canopy mounted mast to a hole made in the vertical fin upper tip, and a separate segment from the aft fuselage to the antenna above and painted rubber after drying. The port and starboard clear wing tip parts were painted using AMMO-MIG crystal red and green respectively. Last items to be added were the kit provided teardrop lower wing aileron counterweights which were painted the same color as the fuselage.

The water tower at Hertzelia served as the control tower at the improvised air strip.
Conclusion:
Eduard's long awaited 1/48 scale model of the Avia S-199 is the most accurate rendition of this Czech built version of Messerschmitt's iconic World War II fighter. The introduction of printed resin parts is best handled by placing them in a cup of hot water prior to removing them from their supports. I hope that in future releases, delicate detail will be "beefed up" and brittle resin parts such as landing gear, antenna masts and probes be replaced with brass. That said, after nearly 50 years of waiting, I'm delighted to have on my shelf accurate models of Israel's foremost fighter plane.
Acknowledgements:
I want to thank Vladimir Sulc of Eduard models for sending me these review samples and Uschi van der Rosen and Floyd Werner for sharing with me of their knowledge of the Messerschmitt and German WWII aeronautical design.


Comments