Velvetta I Spitfire - 1/48 Spitfire Mk.IXe
- Yoav Efrati
- Jul 27, 2020
- 8 min read
Updated: Aug 2, 2025

Velvetta (hand cream) was the code name given to the airlift of 20 overhauled Supermarine Spitfire Mk.9e's from Avia aviation facility in Kounvice, Czechoslovakia to Ramat David air base in Israel, via Niksic Yugoslavia. On 24 September 1948, the first six Velvetta Spitfires took off from Czechoslovakia on their way to "Etzion" improvised air strip in southern Yugoslavia.

For this extended over water flight these Spitfires were modified by Sam Pomerance to make the 1,400 mile distance flight to Israel with the installation of a 90 IMP gallon (409 liter) center line fuel tank and a 60 IMP gallon (273 liter) fuel tank of German design, under each wing.

Due to technical difficulties, only three of the first six Velveta I Spitfires made it to Israel, on 27 September, 1948 and given identification numbers Daled-132, Daled-133 and Daled-134. All Spitfires ferry flown to Israel were ex-Czechoslovakian clipped wing Mk.IXe versions wearing RAF standard colors of Ocean Gray (f.s.16187) and Dark Green BS381c/641 (f.s.14086) on top and Medium Sea Gray BS381c/637 (f.s.36270) underneath.

101 Squadron commander "Modi" Alon who took part in the airlift of the Velvetta I Spitfires but due to inclement weather he and Boris Senior made an emergency landing in Rhodes where their Spitfires were impounded by the authorities until after the war ended.

101 squadron pilot Danny Shapira next to heavily dusted Spitfire Daled-132 which received the white tail number 12 prior to the December 1948 operation "Chorev".
Eduard 1/48 scale Spitfire Mk.IXe kit contents:
The kit used for this review is Eduard 1/48 scale Israeli Spitfire kit releases #8283 which depicts 1948 Velvetta I, Spitfire with the fuselage number 14 applied to the empennage, prior to the December 1948 "Operation Chorev". Spitfire 14 was one of the first three Velvetta I Spitfires to arrive and initially had the fuselage number D-133 applied. In November of 1948 the Spitfires replaced the alpha numerical tail number with a four digit number, with Daled-133 receiving the IAF airplane type number 2004 and squadron identification number 14.

Spitfire 14 fighting career was short lived; it attained a single air to air kill on December 30, 1948 when flown by RAF WWII veteran John Doyle downed one of two Royal Egyptian Air Force Macchi 205 fighters engaged in strafing IDF ground forces over Ber Hama in the Negev. On January 5th, 1949, "Red" Finkle blew a tire upon landing at Hatzor, which resulted in Spitfire 14 flipping over and causing irreparable damage.

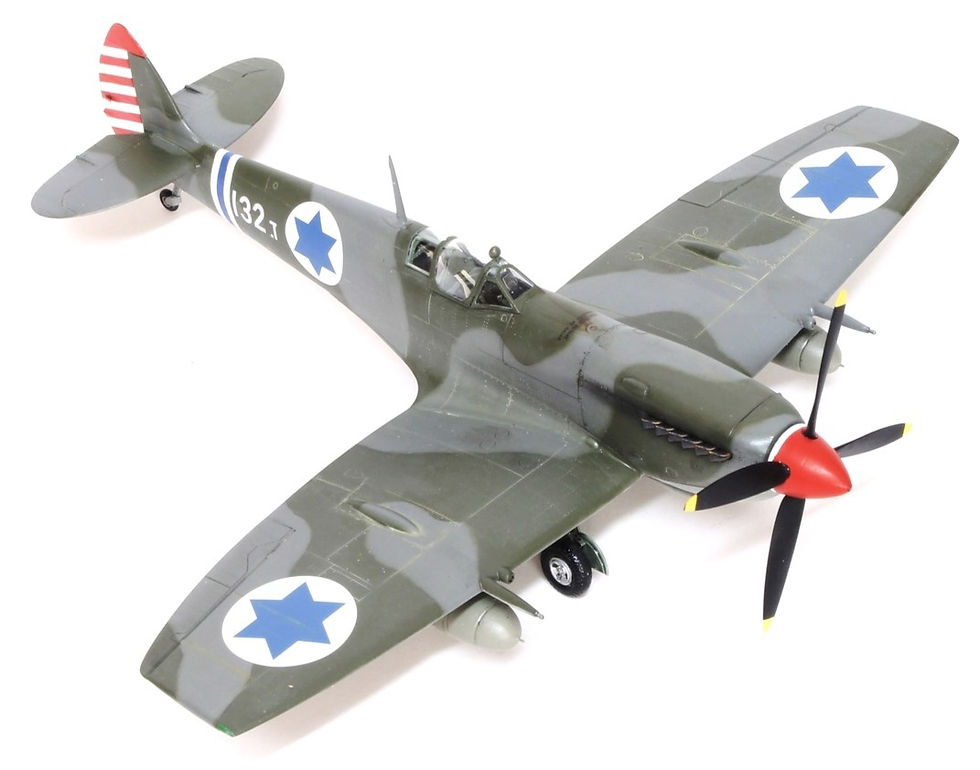
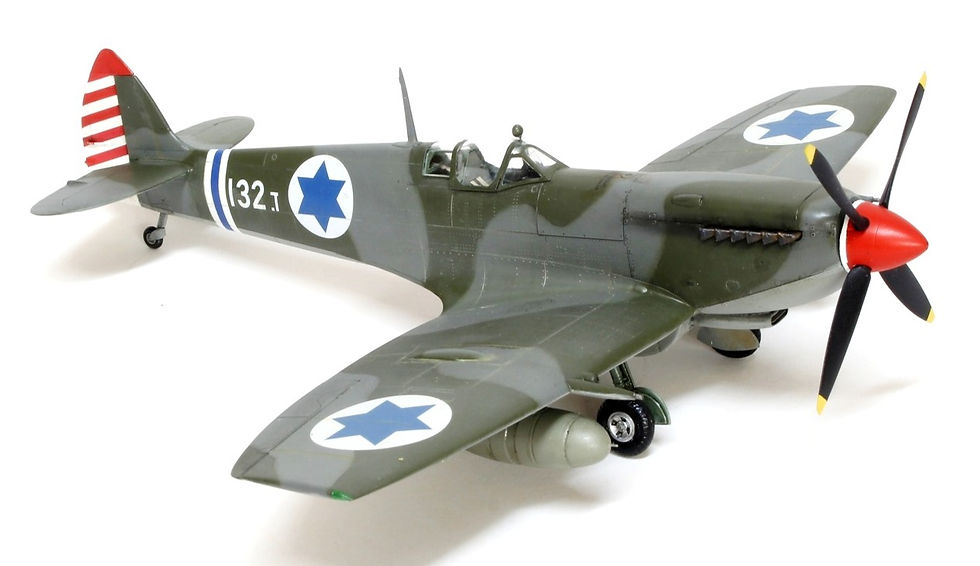
For my modelling subject I chose another Velvetta I Spitfire, Daled-132 which is the only Velvetta I Spitfire photographed with an "Operation Yoav" Daled tail number. Daled-132 has no confirmed air to air kills during that operation, but did attain two air to air kills while painted with the tail number 12: on 05 Jan 1949, Sye Feldman is credited with downing a REAF Macci 205 and on 07 Jan 1949, William Shroder is credited with downing a RAF Tempest.
Kit construction:
The ProfiPACK kit includes canopy masks, and pre painted photo etched instrument panel and seat harness. To improve the model's authenticity, I added Brassin cross thread tires, Brassin Spitfire centerline fuel tanks, IsraDecal IAF-1, 101squadron insignia decal and a pair of German WWII 60 IMP gallon fuel tanks sourced from a pair of Hobby Craft Avia S-199 kits. After a study of the kit instructions, I removed all unneeded parts highlighted in blue in the instructions from the parts trees to avoid incorrect parts use.
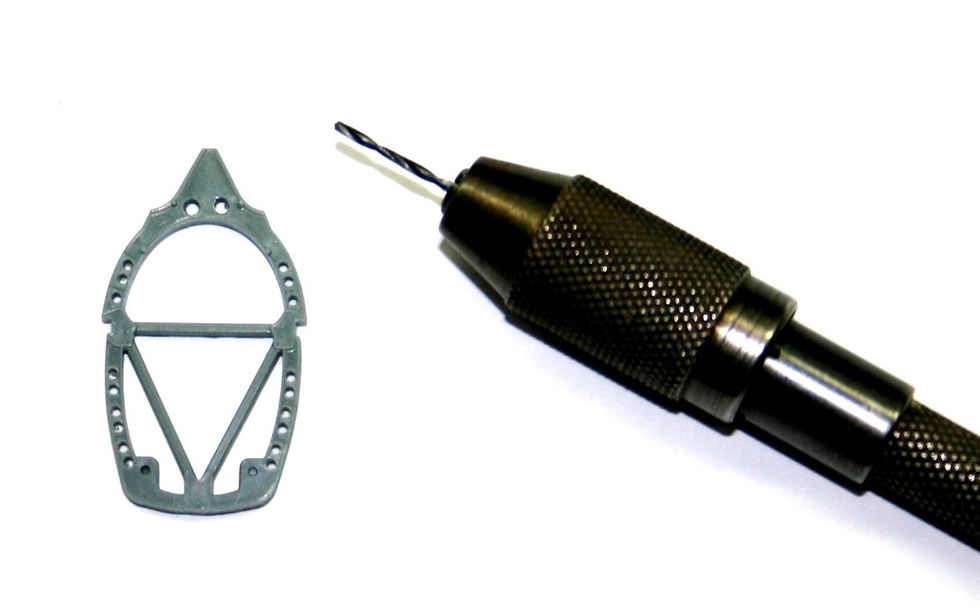
Cockpit bulkheads parts F5 and F56 circumferential lightning holes were drilled through with a #67 drill bit.

Initial painting began prior to joining the fuselage and wing halves, the cockpit was sprayed Testors Model Master RAF Interior Green (catalog number 2062). The seat was brush painted a red-brown mixed using a mix of Humbrol 153 Insignia Red and 119 Tan; with a Revell #6 Matt Black back rest. Kit provided pre-painted seat belts were a fixed using cyanoacrylate cement. Touch up painting followed in order to paint out the white foggy residue formed by cyanoacrylate evaporation. To further accentuate the seats, a wash of Tamiya X19 clear Smoke was applied to the seat corners and surrounding the belts. A coat of flat was necessary to give the cockpit an even luster.

Joining the fuselage halves together revealed a gap formed above the instrument panel which requires trimming the instrument panel bow formed by assembling F4/F66/PE2/PE1. The gun sight broke off during this stage and was salvaged for installation after seam clean up.
Wing assembly was per kit instructions up to the assembly of the radiators, who's face arrangement is incorrectly shown in the kit’s instructions. The sequence of assembly which I found most appropriate was to first install the radiator housing side supports G7/G8 and G13/G14. Paint radiator screens Humbrol 11 silver followed by a wash Tamiya X19 Smoke. Next attach intake screens G28 and G30 with the short segment of each located to the right of each intake. Attach the aft radiator screens G27 and G29 with the short horizontal segments located to the left side of each opening. Prior to adding the radiator intakes lower panels G1 and aft variable drop doors G6, their inner surfaces were brush painted along with lower wing intake cavities. Spitfire 14 intake inner surfaces were painted Humbrol 165 Medium Sea Grey. Photos of parked Spitfires show the radiator intake aft doors in the closed position so actuators G37 and G39 were used. Part F36 to be added forward of the starboard intake does not have a locating hole, so one was drilled and a metal rod bent to shape and attached with cyanoacrylate cement.
Wheel wells Humbrol 165 Medium Sea Grey. Details were brought out with a wash of India ink mixed with Future Klear thinned with alcohol. Excess was wiped off with a cotton bud moistened with alcohol. Prior to joining the upper and lower wing halves, the lower wing wheel wells and upper wing halve’s inner wheel well detail were sprayed Humbrol 165 Medium Sea Gray undersurface colour. Details were enhanced with a wash of black India ink tinted Future Klear. The upper wings were cement to the lower using cyanoacrylate along the wings trailing edge and plastic melting Tamiya green top cement along the wing leading edges. After a day’s drying time, the wing leading edges were sanded smooth to a gap free joint and the trailing edges were joined with no excess plastic to remove or sink holes to worry about. 1948 vintage Velvetta Spitfires were delivered with clipped wing tips, so kit provided clear parts A7 and A13 were used. Attachment of the ailerons followed, with the application of cyanoacrylate cement applied sparingly along the wing trailing edge recess. Cyanoacrylate was also used to fill the gap between the ailerons outboard edges and wing tip trailing edges which are susceptible to snagging and breakage as a consequence.
Joining the fuselage and wings together required a little force in order to minimize the height between the wing to body fairing and the wing. At the wing to fairing joint line I abstained from using liquid cement in an effort to retain a sharp panel separation line. Fishtail exhaust G5 has excessive flash at the stack outlets. Their removal using a razor saw revealed that the exhaust outlets lack the required opening. To replace it, I used part G4 from a second kit. The need to substitute the left side exhaust stacks part G5 with a spare left side stack G4, resulted in incorrect alignment of the exhaust openings relative to each other when viewed head on. To enable realignment of the left side exhaust openings (G5), the lower flange of part G9 and adjoining G43, were trimmed off with nippers. Once the trimmed subassembly “E” angle was set using liquid cement, it was affixed into place using cyanoacrylate cement. With the exhausts in place, engine cover E7/E8 was added using the same method as above, to avoid melting the joint line. Installing the lower cowling subassembly F to the forward fuselage revealed that the edges of the lower cowling extended beyond the fuselage sides. I needed to sand the lower cowling edges flush with the fuselage sides as well as filler to fill the unexpected gap between them.
Horizontal stabilizers F74/F79 and F73/F80 installation was trouble free due to excellent fit and wider base than upper joint line. Elevator F12 was attached to the stabilizers using cyanoacrylate cement applied sparingly along the rear spar. Once attached, the joint line was reinforced with liquid cement and fairings F52 and F53 added. Since Spitfire 14’s rudder is painted white, it was not attached at this time and was prepared for white paint application along with the prop G63 and spinner G65 and G66. Fuel tank cap F37 and antenna base F51 completed fuselage assembly. Wing guns G40 and G74 were added next; to avoid inadvertent breakage of the wing guns, G74 stem insert was replaced with a metal rod inserted through a hole drilled along the entire length of the part; with the forward barrel replaced with a hollow metal rod. The prominent windshield mounted rear view mirror made from a half circle part 41 and brass rod drilled through it and through the windshield frame.
Opting for a closed canopy, the kit instructions call for the need to cut a small square portion of the fuselage, at the base of the rear wind shield placement location. Dry fitting the closed canopy clear part in place revealed the need to add plastic shims between the aft canopy wind shield base and the fuselage. The canopy was cemented in place followed by the clear gun sight and wind shield. The mast antenna was scored with a razor saw and a .05mm diameter rod was cemented along its entire length, using cyanoacrylate filler which was sanded smooth once it set in place. Resin main landing gear wheels were attached to the landing gear how's axels were replaced with metal rod stubs.
Assembly tip: Using liquid weld, parts are pressed together to form a "liquified" plastic bead along the seam, once it hardens it can be sanded smooth with no seam lines.

Painting the model:

The kit provided canopy masks fitted great and the model was ready for painting in no time. Revell 04 White was applied to the aft fuselage, just forward of the empennage. A band was formed using three strips of Tamiya Tape cut 2mm wide. The center band was removed and the exposed area painted blue mixed using Revell 04 white and 752 clear blue, to match the kit's decals. White was also applied to the spinner, swash plate and rudder, these areas were masked and Revell 330 red sprayed on the spinner and atop the rudder. The lower fuselage and wings were sprayed Humbrol 165 Medium Sea Gray. The lower surfaces were masked and Humbrol 106 was sprayed atop the upper fuselage. Using photos of Daled-132, penciled demarcation lines were drawn for the application of the Humbrol 163 Dark Green upper surface camouflage. With the upper surface camouflage applied, the exhaust nozzles were brush painted Revell 92 brass. With a thin spray application of Revell 09 tire black over the exhaust, an authentic burned iron exhaust pipe effect was achieved.

The external wing fuel tanks were sprayed RLM02 Grey using Revell 45 mixed with 30% Revell 90 aluminum.
The entire airplane was sprayed with an alcohol thinned layer of Pledge Future Klear in preparation of decal application. Kit decals were used throughout with the exception of the squadron insignia which was taken from IsraDecal sheet IAF-1 and the Daled 132 tail number furnished from Berna Decals white numbers and letters decal sheet BD-02.


If you like this article and want to support my efforts in maintaining this web site you may make a donation through my PayPal account yoave@elal.co.il
Thank you,
Yoav Efrati


Comments