
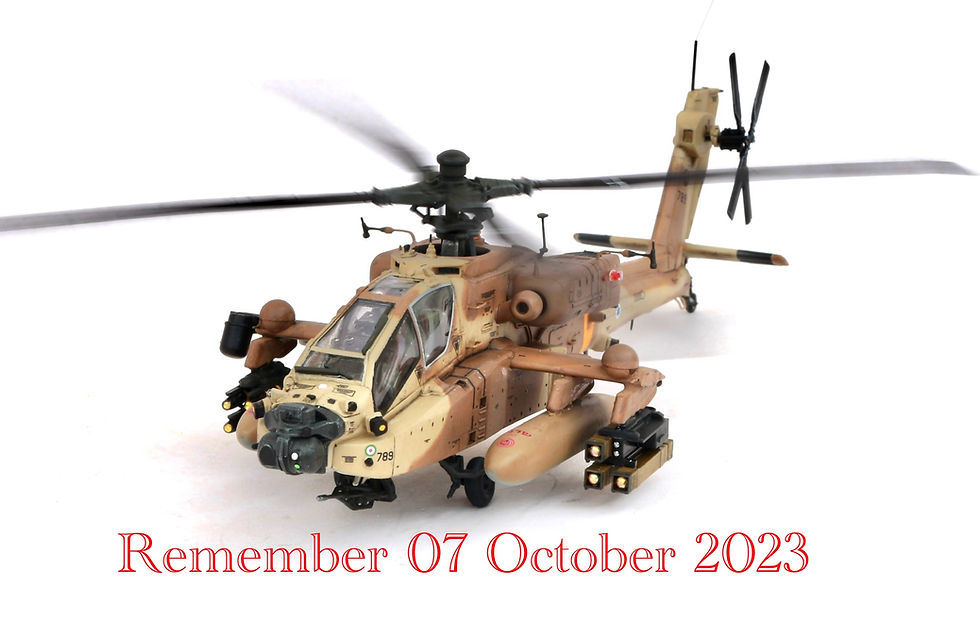
Revell 1/72 F-35A - Iron Swords Adir
- Yoav Efrati
- Sep 29, 2025
- 13 min read
Updated: Oct 12, 2025
With nearly all current model manufacturers having the Lighting II on the store shelves, what does Revell offer in their new F-35A that would make it your first preference? Better in dimensions than the Academy kit, better in surface detail than Italeri, a bomb bay that Tamiya ignored; all that and a “beast” loading carried by the Adir during "Iron Swords". Additional items unique to this kit include intake and exhaust covers, flush or unpowered aircraft dropped flaps, an extensive weapons set that offers six GBU-31 2,000lbs JDAMs, a pair of AIM-9X Sidewinders, four AIM-120 AMRAAM radar guided missiles, six laser guided bombs, highly detailed external pylons and internal weapons bay, optional open or closed bomb bay doors, upper aft fuselage parachute pack (for the Norwegian F-35As) and a seated pilot figure with an extended stowable cockpit ladder. Markings in the new Revell kit are provided for a German (yet to be finalized), Norwegian and USAF Lightning II based at Lakeheath, England.

The current war in Israel, given the name operation "Iron Swords", Israel's two F-35A "Adir" squadrons have conducted operations on six fronts – Gaza, Lebanon, Syria, Yemen, Iraq and Iran. A recent interview with an F-35I Adir female pilot revealed that it's not usually for Adir pilots to conduct operations on three fronts on the same mission. Be it close air support in Gaza, surface-to-surface missile suppression in Lebanon followed by combat air patrol against suicide UAVs launched from Yemen or Iraq, and all this done at night. During Iron Swords, IAF Adir's have been cleared to fly with a pair of 2,000 GBU-31 JADAMs mounted underneath the external inboard pylon weapons stations. One Adir photographed in this configuration was 140sq F-35i number 921, which became the first Lightning II in the world to attain an air-to-air kill, on the night of 15-16 March 2021, when it's pilot downed an Iranian suicide UAV launched from Iran into Israel. The Adir's technological superiority over the current battlefield has made it the Israeli Air Force's first choice to equip a third squadron that will continue into the next quarter of century. Further progress being made with the "Adir" is to certify it for external carriage of four 2,000 lbs JADAMs which will enable it to carry six bombs, making this aircraft type second only to the F-15I Ra'am in heavy lift capability of seven 2,000 lbs JADAM load.

With the latest March 2025 delivery of F-35As to the 116 squadron, I received an unexpected gift; the stars and bars decal applied to Adir number 967 on its delivery flight to Israel. With an actual FS 595c-36170 colour sample at hand, I can confirm the accuracy of model paints released so far.

Building the Model:
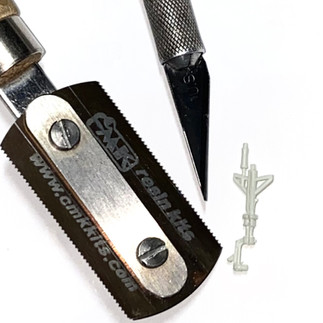
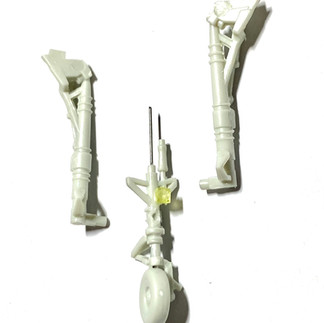
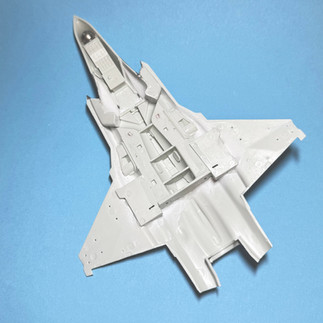
Revell 1/72 F-35A is molded in relatively soft plastic which requires careful handling and some part reinforcement. To protect the sharp end of the fuselage nose halves prior to joining them together, I wrapped them with tissue and masking tape. I usually diverge from the kit's building sequence, preferring to assemble parts that require additional time for cement hardening. I began with the assembly of the external stores, setting aside the kit's assembled laser guided bombs for use on other models such as the F-15i or F-16C/D.
On this model I opted to use
the kit's six JADAMs. Prior to joining the two halves of each bomb together, trim off the forward inner pin to allow for the two halves to align. The six bomb's pylon attachment slots are located incorrectly on the bottom half of the bombs instead of on top. These recesses were filled with half round plastic rod, and new locating holes were drilled on the top surface of the bombs. Attachment of the bombs to their bomb bay and wing pylons was improved by implanting a brass wire pin into the existing attachment locations. Next to be drilled were the lower wing pylon holes; to avoid drill drift, I used a pin to indent the center of each external pylon lower wing location prior to drilling. A #76 drill bed provided the proper diameter hole needed for the brass wire pins I inserted. By using brass wire, one can make final alignment adjustments when attaching the bombs to the pylons. The bombs and pylons were dry fitted to the wings prior to painting. The kit's four AIM-120 missile tips are blunt and were sharpened using a sanding stick and 1000 grit sandpaper. Haphazard sliding of the parts trees over one another when removing them from the kit's side opening box, resulted in my braking off one of the kit's AIM-9X forward fins and angled rear fin; these had to be restored using sheet plastic strips; while at it, I drilled the aft end of the Sidewinders as well. After careful filing and sanding of seam and mold separation lines; the pylons, JADAMs, AIM-9X Sidewinders and AIM-120 AMRAAMs were painted Atom-20133 grey and set aside to dry.


Moving on to the landing gear, the main gear actuators have annoying flash that must be carefully removed without breaking off the cylinder struts. The kit's plastic is a bit soft so to reinforce the nose gear strut, I bored the aft side (less visible) center using a razor saw; widen the channel with the back end of a no.11 blade; drill a hole midway through the nose wheel and insert a .05” piano wire through the strut and wheel. Initial bonding is done using liquid cement. The channel is then filled with cyanoacrylate cement which also reinforces the bonding of the strut and metal rod. Note the offset location of the nose gear mounted taxi light which was added after I drilled it to accept a reflective lens. The orientation of the main and nose gear forks is ambiguous in the kit's instructions, so I referred to closeup photos of the landing gear to confirm their position.


The inner surfaces of the bomb bay, main and nose gear doors are marred by ejector pin indentations. These were sanded off using a coarse sanding stick, followed by 400 grit sandpaper and a brush on layer of Tamiya white top liquid cement that smoothed out the surface. The nose gear doors are provided as a single part. They were separated from one another using a razor saw. Additional subassemblies joined together prior to painting included the exhaust, pilot seat, bomb bay and nose wheel well. Flaps and ailerons were also assembled at this time but they required filler due to gaps along their external surface.

To continue with the assembly of the fuselage the following parts had to be painted white: bomb bay, wheel wells, inner surface of the doors, the intake trunks, step ladder bay and landing gear. Atom paints white 20000 diluted with Holloway House Quick Shine (formerly known as Future Klear) was airbrushed over the kit's bare plastic parts using a Paasche single action airbrush with an H1 tip. Unlike enamel paints that can be applied relatively thick to cover the color of the plastic, acrylic paints need to be applied in layers for complete coverage. Although several layers are needed, the advantage of acrylics is that they dry relatively fast and each subsequent layer does not soften or loosen the previous layer.


The kit's highly detailed bomb bay details were brush painted with Atom paints 164 silver, 29 red, 162 black, 147 grey, 55 brown and 18 yellow, with recessed detail weathered using A-mig-1602 Deep Grey panel wash. The main and nose gear bays were likewise detail painted and washed prior to cementing them to the lower fuselage using cyanoacrylate cement. Although not shown in the kit's instructions, I cemented a metal ball ballast to the lower fuselage forward of the wheel well. To prevent possible loosening, 5-minute clear epoxy was used to fill the voids in the lower nose section around the ball. Again diverging from the kit's instructions, the Atom-20133 grey cockpit was cemented to the upper fuselage halves instead of atop the wheel well. To prevent subsequent handling damage and paint overspray, I covered the bomb bay detail with Tamiya Tape over which the kit's closed bomb bay door optional parts were temporarily attached using Blue Tack "plastic putty". The nose and main gear wheel wells were masked using Tamiya Tape and Blue Tack.


Prior to joining the intake halves together, they were initially painted white, RAM paint demarcation was determined from photographs and masked with the dimensions shown in the attached photograph. RAM paint areas match FS595b-26134, to which I found that Vallejo grey 71.280 to be a perfect match (although it is incorrectly labeled as FS36170). The intake RAM forward area was brush painted with the Vallejo 71.280 and the two intake halves were cemented together using cyanoacrylate cement. The intake assemblies were joined to lay flush with the fuselage and cemented from the inside surface with cyanoacrylate cement, to avoid melting the intake leading edge thin plastic. Once the intakes forward section set in place, the remaining aft section of the intake was cemented to the sides of the fuselage again using cyanoacrylate cement. Excess cyanoacrylate cement was sanded smooth from the intake joint lines and the upper fuselage was joined with the lower.


The forward tip of the nose, wing tips and wing roots were joined together using cyanoacrylate cement to facilitate a strong and rapid setting joint lines. Wide gaps appeared along the intake strake joint lines, these were eliminated by pressing the joints together until the cyanoacrylate cement bonded the two halves together. Aft fuselage, wing leading edge and trailing edge remaining joint lines were bonded together using Tamiya quick setting liquid cement.


With upper and lower fuselage and wing joint lines sanded smooth, I proceeded with the attachment of the flaps. The kit provides two sets of flaps, one with horizontal insert tabs for a powered airplane and another with angled insert tabs for an unpowered airplane. Wanting to display my "Adir" in a parked configuration, I followed the kit's steps 23 and 24 for an unpowered airframe. Unfortunately, the kit's instructions show incorrectly numbered inboard actuator fairing attachment that hinder attachment of the flaps at a proper droop. For correct lowered flap assembly, use the following numbered flaps and fairings: 71with 55 and 74 with 56. With horizontal stabilizers cemented in place, the model is ready for paint. While waiting for an opportunity when the wife’s out of the house, as to not make compressor noise in the house, it was time to return to brush painting.
Painting the model:
The kit's canopy is conveniently molded in two halves, providing the frame and canopy bow as one part, over which the yellow tinted clear part is attached. One must be careful when removing the clear canopy from the parts tree, not to cause it inadvertent cracking. The canopy inner surfaces and bow were painted A.MIG-032 black and the outer canopy frame was brush painted Vallejo 71.280. The canopy was attached to the frame using Devcon clear 5-minute epoxy which dries clear and does not craze, melt or fog the clear plastic.


Removing the tape used to hold the wheel and bomb bay doors when spayed white revealed dry paint which hardened on the surface. Since the white paint is acrylic, the dried paint was removed using pharmaceutic alcohol applied with a cotton swab.


I found ATOM-20158 a very close match to 36170 Have Glass Grey. The external surfaces of the doors were brushed with two layers of paint to achieve opacity. Although Vallejo 71.280 Camouflage Grey is labeled FS 36170 it does not match Have Glass Grey, but it does match perfectly the FS 26134 RAM coating color. To improve the Vallejo paint's resistance to wear, especially along the leading and trailing edges of the wings, stabilizers and radome, I added a drop of "Quick Shine" acrylic floor finish to the paint, prior to applying it over the required areas using a brush. I found that adding the acrylic clear gloss to the acrylic paint also improves it's self-leveling quality to cure without brush marks.


The separately painted vertical fins were attached to the fuselage after it was painted, revealing wide gaps at the root of the fins. The gap was filled using clear 5-minute epoxy glue which was brush painted ATOM-20158 after the glue dried to the touch.

I used ATOM paint's self leveling qualities to paint the kit's JADAMS. The ATOM colors used to paint the bombs were A-20133 light grey, A-20020 yellow and A-20069 olive drab. The bombs were sprayed ATOM-20133 Light Ghost Grey and set aside to harden for more than 24 hours. The nose tip was brush painted ATOM-20000 Golden Yellow, which is equivalent to Insignia Yellow. ATOM-20069 Olive Drab thinned with window cleaner to a consistency of a wash was applied to olive drab areas of the bomb. The wash flowed up to the edges of the grey raised detail of the bomb. Un-thinned olive drab was brush painted inside the "boxes" after the wash dried. 1mm wide strips of Tamiya Tape were used to mask the bomb's yellow nose ring and olive drab was brush painted onto the remaining areas of the bomb. The bomb's nose tip was painted with a light shade of grey.

The kit provided AIM-120 missiles have two small vanes molded forward of the forward fins, I could not find reference to the existence of these "new" vanes but left them in place. There is no demarcation provided in the plastic for the location of the radome but that's where the kit's instructions came in handy. The kit's armament instructions are printed to 1/72 scale, which helped me locate the radome demarcation 17mm forward of the forward fins using a strip of Tamiya Tape cut to that length and used to locate the radome line on all four missiles provided in the kit. Once the ATOM-20000 white painted radomes were masked, their fuselage was brush painted ATOM-20133 Light Ghost Grey and fins with a mix of ATOM-20167 Gun Metal and ATOM-20163 Black. I again referred to the kit's painting instruction to locate the fuselage yellow and brown stripes, which were painted ATOM-20020 and ATOM-20055 respectively.

To add some color to this model, I decided to use the kit’s intake and exhaust covers. They were painted ATOM-20028 red with black handles. The pre-painted intake covers were inserted in place and secured with white glue. The exhaust cover was inserted into the exhaust nozzle and cemented in place using 5-minute clear epoxy applied to the forward (unseen) part of the exhaust cover. The kit's exhaust can be attached at final assembly, it was painted ATOM-20000 white, inside and out, and weathered using a grey enamel wash. The exhaust external "turkey feathers" were brush painted with a 1:1 mix of ATOM-20169 and ATOM-20160. 140sq intake and exhaust "Golden Eagle" emblems and stencils which were obtained from an early IsraDecal Adir decal sheet that's no longer available.


Currently available IsraDecal sheet IAF-120 was used for the Star of David, squadron insignia and individual aircraft identification markings. Stencils and formation lights were sourced from Revell's decal sheet. All decals were applied on the model surface whetted with Quick Shine acrylic clear. Revell’s decals are of excellent sharpness, enabling one to read each letter of every word, their carrier film is thin and they tend to bond quickly. The “no step” decals are to scale and therefore are small, which I managed to bond several of them to themselves. Fortunately, IsraDecal Studio provides stencil decals in addition to the Adir’s squadron markings, they came in handy on this model. Upper and lower wing roundels were positioned 15mm from each wing tip and 17.5mm from the wing leading edge to the apex of one Star of David triangle.

Once all decals were in place, I continued with the addition of the landing gears, doors and pylons. The nose gear shoulders are too wide to fit inside the wheel well so they required slight trimming with a number 11 blade prior to inserting them into place. Once attached to the wheel well, the diagonal strut support was added and both were secured in place with cyanoacrylate cement. The main gear were dry fitted into their wheel well attachment slots and the diagonal supports cemented to the gear. Once joined together, the main gear and diagonal struts were cemented to the wheel well followed with the attachment of the wheels, all secured into place using cyanoacrylate cement. Two of the kit's JDAMS were attached to the bomb bays prior to attaching bomb bay and main wheel doors. Door attachment was made easy due to the kit's well-fitting parts and hinges. With all parts being pre-painted, I secured them in place using cyanoacrylate cement. The kit provided inboard pylons were cemented flush with the lower wings also using cyanoacrylate cement, this revealed wide gaps between the pylons forward attachment lugs and the lower wing surface. Gaps between the pylons and the wings were filled using clear 5-minute epoxy glue smoothed out using a moist cotton swabs.
Prior to attaching the kit provided step ladder to the fuselage, the less visible inner surface was bored out using a razor saw and a .5mm piano wire inserted along its length. It was attached to the fuselage along with the open door provided in the kit using cyanoacrylate cement. The parts were painted ATOM-20000 White and ladder segments ATOM-20167 Gun Metal, with the outer surface of the door using ATOM-20158 grey. At this stage the model was airbrushed with a matt coat mix of Tamiya X21 base and Holloway House "Quick Shine".

The cockpit instrument panel and combing were cemented and together and their interior painted ATOM-20133 grey. The kit provides two instrument panel decals for an airplane powered (with pilot inside) and unpowered (black) screen. Although I did not include the pilot in my build, I opted for the more colorful "power on" screen. The kit provided seat is devoid of seat belts, so I used 1mm wide strips of Tamiya Tape to replicate them and affixed them in place using cyanoacrylate cement applied with a tooth pick. To give the seat a "warmer" look, I added olive drab to the black. exaggerated use of colors made the airplane's dull black and grey cockpit appear more interesting.


The kit does not provide the pitot probes located on both sides of the nose section, aft of the radome, similarly shaped probes were sourced from an old Squadron True Details brass antenna set. To add some color to the overall grey airplane, I cut 1mm wide strips of Tamiya Tape and attached them to safety pinned locations inside the wheel wells, bomb bays, gun opening, inboard pylons (after bomb attachment) and nose pitot and static probes. Each strip was affixed in place using cyanoacrylate cement and painted ATOM-20029 red.

Silver reflective lenses were attached to the nose gear taxi light and forward nose sensors prior to attaching the nose sensor clear part using clear 5-minute epoxy. Once in place the nose sensor frame lines were brush painted ATOM-20158 Have Glass Grey. The last item to be attached was the canopy. The F-35's forward opening canopy is not typical to the closed and rear hinged canopy jet fighters in my collection so I took the opportunity to use the kit's robust canopy supports to display this model in this unique forward hinged canopy pose. Kit assembly was completed once the wing tip position lights were painted red for the port and green for the starboard wing tips.


If you like this article and want to support my efforts in maintaining this web site you may make a donation through my PayPal account yoave@elal.co.il
Thank you,
Yoav Efrati


Comments